h. Doorpost Top Assembly Removal and In-
stallation.
(1) Remove the door spars (para 3-11).
(2) Remove the door control arm b, above.
(3) Remove the diagonal door control arm
described in c, above.
(4) Remove the nut and washer (3, fig.
3–30) and bolt that secure the doorpost top
assembly (4) to the doorpost assembly (6) and
remove the doorpost top assembly.
(5) Install the doorpost top assembly in
reverse order of removal.
i. Doorpost Removal and Installation Refer
to paragraph 3-11 for the removal and installa-
tion of the doorpost assembly.
3-21. Door Winch and Transom Chord
Assembly
a. General. Organizational maintenance of
the door winch and transom chord assembly is
limited to the replacement of the cable and
toggle pin assembly and the replacement of the
transom chord strut.
b. Cable and Toggle Pin Assembly, Removal
and Installation.
(1) To replace the complete assembly,
perform the following:
(a) Remove the drum socket (14, fig.
3–31 ) from the cable (13).
(b) Remove the two machine screws
and lockwashers (15) that secure the cable
clamp (16 ) and cable to the side of the winch
drum (9), and unwind the cable and toggle-pin
assembly from the winch drum.
(c) Pull the cable from hole (17) in the
winch drum.
(d) Install the complete assembly in re-
verse order of removal.
(2) To replace the toggle pin on a service-
able cable, perform the following:
(a) Remove the stud end (11, fig. 3-31)
of the toggle pin assembly (12) from the cable.
(b) Insert one end of the cable into the
stud end of the replacement toggle pin assem-
bly and secure the stud to the cable.
(c) Insert the other end of the cable
into the hole in the winch drum and into the
drum socket of the replacement toggle pin as-
sembly. Secure the drum socket to the cable.
(d) Place the cable clamp over the cable
just below the drum socket and secure with the
machine screws and lockwashers.
c. Transom Chord Strut, Removal and In-
stallation.
(1) To replace the transom chord strut,
the door winch and transom chord assembly
must be removed from the tent. For removal
of the door winch and transom chord assembly,
perform the following:
(a) Remove the end guy assemblies, ve-
hicle door, and tent end section (para 3-12.
.-
3-11, 3-10) .
(b) With two men at the top of
frame, remove the eye nuts that secure
transom chord struts to the end arch.
the
the
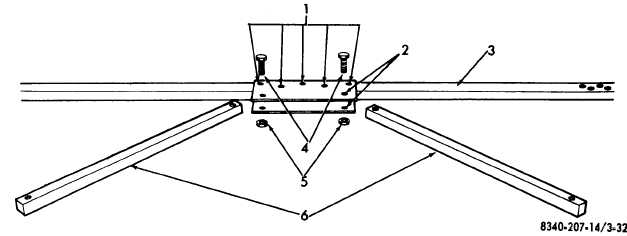
1 Machine screws
3 Transom chord
2 Gusset plates
5 Self-locking nuts
4 Capscrews
6 Struts
Figure 3-32. Transom chord and struts, disassembly and reassembly.
3-38