Figure 3-30--Cont
Figure 3-29. End
wall purlin flap hem rope and disengage the
three hem rope rings from the J-hooks.
(2) Remove the toggle pin from each end
arch anchor bracket and end arch purlin ad-
justment shaft and clevis assembly.
(3) Unscrew the captive and fitting on the
doorpost from the purlin insert and remove the
purlin.
(4) Thread the doorpost captive end fit-
ting into the insert of the replacement purlin
and tighten.
(5) Thread the adjustment shaft into the
other insert.
(6) Adjust the adjustment shaft and
clevis assembly so that the holes in the clevis
will match the hole in the end arch anchor
bracket.
(7) Insert the toggle pin in the clevis and
end arch anchor bracket.
(8) Secure the purlin flap.
c. Toggle Pin and Chain Removal and Instal-
lation.
3-34
(1) To remove and install the toggle pin
and chain on an installed purlin, untie the ends
of the appropriate end wall purlin flap hem
rope and disengage the three hem rope rings
from the J-hooks.
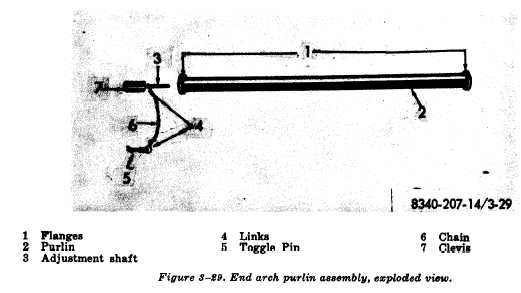
(2) Remove the toggle pin (6, fig. 3-29)
from the end arch anchor bracket and end arch
purlin adjustment shaft (3) and clevis as-
sembly (7).
(3) Unscrew the adjustment shaft from
the purlin insert (1) and slide link (4) at-
tached to the chain (6) from the adjustment
shaft.
(4) Slip the link of the replacement as-
sembly over the adjustment shaft.
d. Adjustment Shaft and Cevis Assembly
Removal and Installation.
(1) Follow the procedure in c (l), (2),
and (3) above.
(2) Thread the adjustment shaft of the
replacement assembly into the purlin insert.