TM 10-8340-225-10
2-9. ROOF CAP INSTALLATION-CONT.
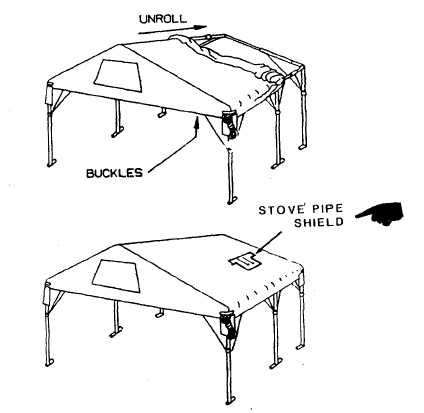
e.
Release the side buckles on each end of the roof cap roll and refasten them around the frame, so that the strap
holds the sides of the roof centered over the frame. The wide reinforcement is the center roof reference.
f.
Unroll one half of the roof cap towards the end and stretch the corners over the corners of the frame. Repeat
for the other half of the roof.
g.
Fasten the buckles, located on the underside of the roof cap, around the frame and pull them tight to take any
sag out of the roof. There are a total of eight buckles, four on each side.
h.
When a space heater will be used, open stove pipe shield flap, roll inward towardthe top of tent and secure
with tie tape. For installation of space heater, refer to applicable space heater TM in Appendix A.
2-10.
FINISHING THE FRAME . Before attaching the walls, it is necessary to extend the legs of the tent frame. Do so
as follows:
a.
On one side at a time, with one person on each of the two corner legs, lift that side of the tent into the air.
b.
Each person extend their corner leg by pulling the locking pin and telescoping the leg out until it locks into
position. Position the foot lengthwise of the tent and release the locking pin. The leg will automatically lock into its
extended height position. Intermediate holes are provided for final fine tuning of the height adjustment. Avoid letting
the locking pin position in one of these intermediate holes by rotating the foot to misalign the holes with the locking
pin.
Change 1
2-15