
TM 10-5410-223-14/1
solvent to evaporate slightly (not wet) and press
(3) Apply adhesive and activate adhesive as
together about six to eight inches (15.24 to 20.32 cm)
described in paragraph a., above.
of the seam to ensure that no more seal will be joined
(4) Install new patch and use roller with
at a time than has been activated.
pressure to bond patch.
(4) Join seams gradually. Press the surfaces
5-8. Repair Procedures for Sewn Fabric Parts
together by moving the finger or thumb along the
a. Removal of Sewn Fabric Parts. Remove sewn
seam. Squeeze out all air bubbles from between the
fabric parts by carefully cutting stitches from fabric
adhesive surfaces.
parts, with a seam ripper or other sharpened tool.
(5) Roll each six to eight inch (15.24 to 20.32
Remove cut stitches from fabric parts.
cm) section immediately with the roller provided in
the repair kit. When the seam is completely joined,
CAUTION
reroll the length of the seam with roller.
Use extreme care in cutting stitches to
e. Replacing Repair Patches (patches over holes,
prevent cutting or other damage to fabric.
tears, etc.). If a repair patch loosens at the edges, do
If fabric is cut or otherwise damaged, apply
not remove the complete patch for repair; cut off
patch to damaged area.
loose or fringed ends and cover the old patch with a
b. Installation of Sewn Fabric Parts. Position
new larger patch as follows:
parts to be sewn together and temporarily secure the
NOTE
position of parts. Sew parts together with five to
If the old patch is off or has been removed, install
nine stitches per inch (2.54 cm). Refer to figure 5-1.
oversize patch to replace old patch.
Use single needle or double needle stitching as noted
(1) Repair a one inch (2.54 cm) patch with a
on removed part.
three inch (7.62 cm) patch, a two inch (5.08 cm)
NOTE
patch with six inch (15.24 cm) patch and all larger
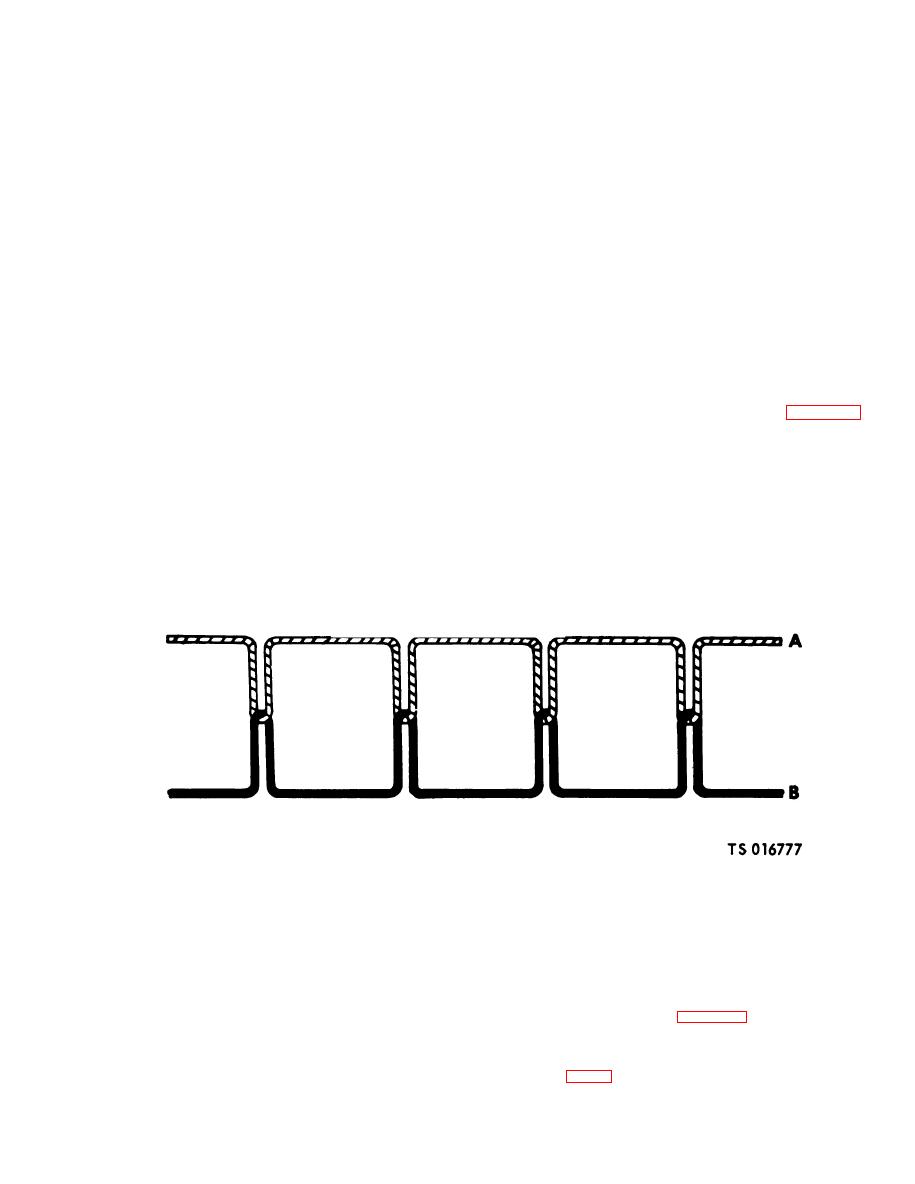
This type of stitch shall be formed with two threads:
patches with a patch extending three inches (7.62
one needle thread, A, and one bobbin thread, B. A
cm) beyond the old area.
loop of thread A shall be passed through the material
and interlaced with thread B. Thread A shall be
(2) Clean the area to be cemented and the
pulled back so that the interlacing shall be midway
applicable side of the patch as described in
between surfaces of the material or materials being
paragraph a., above.
sewn.
Figure 5-1. Stitch type 301.
c. Replacement t of Cover Clamps. To remove and
(4) Select a rivet of the proper diameter and
replace the clamps on the fabric cover, proceed as
length before installing.
follows :
NOTE
(1) Drill out and remove the rivets holding the
Proper length of rivet to be used shall be determined
clamp to the fabric.
by measuring the actual thickness of material
(2) Drill holes in replacement clamp, metal
through which the rivet will go and then selecting
proper grip length per Table 5-1. Proper rivet
backup strip and H-extrusion to accept the next
diameter is important as blind rivets installed in
larger size rivet.
oversized holes will not retain the stem satisfactorily.
(3) Dip rivet in Sealant EC 776, or equivalent.
Undersize holes will not permit proper pull-in of
stems (fig. 5-2).
5-3
