TM 10-8340-222-10
Figure 2-6. Steps in pitching tent, assembly, M-1942. (Sheet 2 of 2)
c.
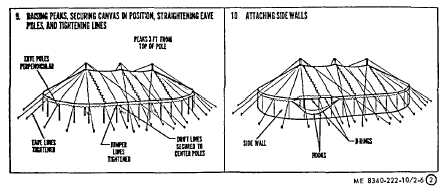
Laying Out and Driving Pins (2, fig. 2-6).
(1)
Eave-line pins. Lay out and drive the 30
eave-line pins according to ground plan. Make sure that
they are driven vertically and that the top of each pin is
no more than 10 inches from the ground. The 27-foot
extension cloth lacing line can be used as an aid in
laying out the eave-line pins of the end sections.
(2)
Guy-line pins. Lay out and drive guy-line
pins according to ground plan. There are nine guy-line
pins, three for each center pole.
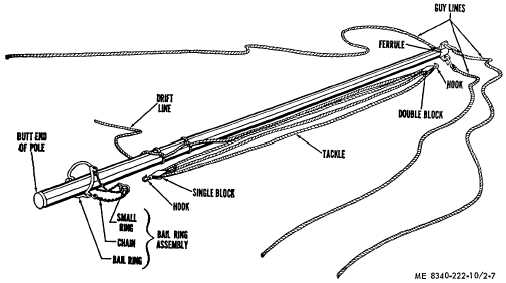
d.
Preparing Center Poles for Erection (3,
figs. 2-6 and 2-7).
(1)
Place the three center poles on the
ground on one side of tent area. The poles should be
perpendicular to the eave-line pins, and the butt end of
each pole should be at a pole marker.
(2)
Attach three main guy lines and one set of
block and tackle to ferrule at top end of each pole. Lash
drift line of block and tackle to pole, with single block 2 or
3 feet from butt end of pole. Place a bail ring assembly
around butt end of each pole.
Figure 2-7. Preparing center pole for erection (tent, assembly, M-1942)
e.
Erecting Middle Center Pole (4, fig. 2-6). One
man stands at the butt end of the middle center pole,
one man at the top end of the pole, and one man at the
end of each of the three guy lines. One of these guy
lines leads to the outside pin on a line at right angles
from the center point of the long
dimensional line of the tent layout (fig. 2-5). This places
the man holding the line directly in line with the man at
the butt end of the pole. The man at the butt end of the
pole keeps the pole in position with the marker by
holding it with his foot. Be sure that the butt end of the
pole is through
2-9