TM 10-7360-208-13&P
4-15. REPAIR OF HEATER TANK ASSEMBLY (CONT).
REMOVAL
Cover and Handles
1.
Remove four nuts (1), eight flat washers (2), and four screws (3) attaching cover (4).
2.
Remove five screws (5) to remove each handle (6).
Ball Valve
1.
If connected, unscrew drain hose (7) from pipe-to-hose adapter (8).
2.
Remove nut (9) and handle (10) from ball valve (11).
3.
Unscrew pipe-to-hose adapter (8) from ball valve (11).
4.
Unscrew ball valve (ii11) from drain pipe (12).
REPLACE
Cover and Handles
1.
Install four nuts (1), eight flat washers (2), and four screws (3), to attach cover (4).
2.
Install five screws (5) to attach each handle (6).
Ball Valve
1.
Remove nut (9) and handle (10) from new ball valve (11).
2.
Place sealing compound on threads to ensure leakproof seal.
3.
Thread ball valve (11) on drain pipe (12).
4.
Install handle (10) and nut (9) to ball valve (11).
5.
Use sealing compound as above, and thread pipe-to-hose adapter (8) to ball valve (11).
6.
Thread drain hose (7) on the pipe-to-hose adapter (8).
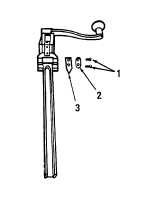
4-16. REPAIR OF MOUNTED CAN OPENER.
INITIAL SET-UP
Tools
General Mechanic's Tool Kit
(Item 1, Section III, Appendix B)
REMOVAL
Remove two screws (1),
I support plate (2) and blade (3).
REPLACE
1. Install blade (3) and I support plate (2).
2. Install and tighten two screws (1).
4-15