TM 9-2330-390-14&P
4-71.
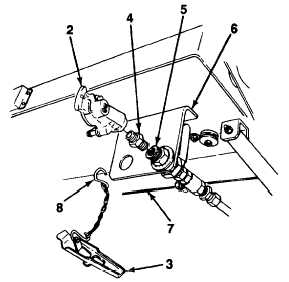
PIVOTING TRAY GLADHAND REPLACEMENT (Con’t).
NOTE
Perform steps 1 and 2 only if removing rearmost gladhand on rear dolly pivoting tray.
1.
2.
Remove dummy coupling (3) from gladhand (2).
Unbend S-hook (8) and remove dummy coupling
(3) from nipple (4).
3.
4.
Remove gladhand (2) from nipple (4).
If nipple (4) is damaged, remove nipple from
anchor coupling (5) at pivoting tray (7) or mount-
ing bracket (6).
NOTE
Male threads of fittings should be coated with antiseize tape if not already
factory-coated with an antiseize compound.
1.
If removed, install nipple (4) on anchor coupling (5) at pivoting tray (7) or mounting bracket (6).
2.
Install gladhand (2) on nipple (4). Ensure that gladhand is properly positioned when tight.
NOTE
Perform step 3 only if installing rearmost gladhand on rear dolly pivoting tray.
3.
Install dummy coupling (3) by hooking S-hook (8) around nipple (4) and bending Shook to tighten. Install
dummy coupling on gladhand (2).
Follow-on Tasks:
l Close air reservoir draincock (see paragraph 3-6).
l Connect intervehicular air hoses (see paragraph 2-11).
l Check for leaks (see paragraph 4-23).
4-165