TM 9-2330-390-14&P
Change 4 4-309
4-111. HYDRAULIC RESERVOIR AND REDUNDANT POWER FITTINGS REPLACEMENT
(Con't).
11.
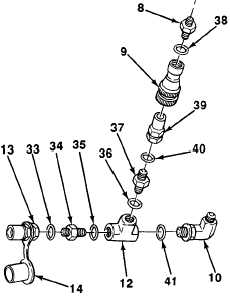
Remove elbow (10) and preformed packing
(41) from tee (12). Discard preformed packing.
12.
Remove straight connector (8), preformed
packing (38), quick disconnect coupler (9),
quick disconnect nipple (39), preformed pack-
ing (40), union (37), and preformed packing
(36) from tee (12). Discard preformed pack-
ings.
13.
Remove quick disconnect nipple (13), pre-
formed packing (33), union (34), and pre-
formed packing (35) from tee (12). Remove
dust plug (14) from quick disconnect nipple.
Discard preformed packings.
1.
Clean all removed components with a clean
rag.
2.
Inspect all components for cracks, breaks,
bends,
corrosion,
or
damaged
threads.
Replace damaged components.
NOTE
Preformed packings should be lightly coated with hydraulic fluid before Installation.
1.
Install dust plug (14) on quick disconnect nipple (13). Install new preformed packing (35), union (34), new
preformed packing (33), and quick disconnect nipple on tee (12).
2.
Install new preformed packing (36), union (37), new preformed packing (40), quick disconnect nipple (39),
quick disconnect coupler (9), new preformed packing (38), and straight connector (8) on tee (12).
3.
Install new preformed packing (41) and elbow (10) on tee (12).
4.
Install dust cap (16) on quick disconnect coupler (15). Install new preformed packing (27), union (26), new
preformed packing (25), and quick disconnect coupler to hydraulic reservoir (3).
5.
Install new preformed packing (23) and straight connector (5) on hydraulic reservoir (3).
6.
Install cap (17) on hydraulic reservoir (3).
NOTE
Largest capscrew is used to mount angle bracket (rear dolly only).
7.
Install hydraulic reservoir (3) with fittings, two mounting plates (22), and angle bracket (21) (rear dolly only)
on pivoting tray (24) with six capscrews (18), 12 flatwashers (29), and new locknuts (28).
8.
On rear dolly only, secure clamp (30) with hose bundle (31) through middle hole of angle bracket (21) with
screw (32), flatwasher (20), and new locknut (19).
c.
CLEANING AND INSPECTION
d.
INSTALLATION


