TM 10-5411-200-14
T.O. 35E4-177-1
4-41.
(cont)
p.
Install bolt through plate and into insert. Hand-tighten insert
against plate.
q.
Mix sufficient amount of adhesive (Item 1, Appendix E) in accordance
with manufacturer’s instructions.
r.
Fill prepared hole completely with mixed adhesive.
Make sure there
are no air pockets.
s.
Force preassembled insert into filled hole with a threading motion
until plate is flush against skin.
t.
Clean excess adhesive (squeeze out) from work area.
u.
Apply masking tape over bolt to maintain alignment during curing
cycle.
v.
Cure non-structural inserts for at least 4 hours at 75° F.
w.
Inserts on which there is structural dependency should be cured at
75° F for 72 hours.
x.
After cure, remove masking tape, bolt, and plate.
y.
Clean skin as required.
z.
Refinish in accordance with paragraph 4-43.
aa.
Non-Potted Insert Manual Installation
(1) Select fastener header model, Appendix B, Item 7 or 8,
applicable to insert to be installed.
(2) Lubricate header jackscrew threads with spray lubricant,
Appendix E, Item 25.
(3) Assemble sleeve and expander
or one-piece insert on header pull-up stud
to engage all threads on stud.
(4) Advance header anvil until.
it is tight on head of sleeve or one-piece
insert.
(5) Position prepared assembly
in hole.
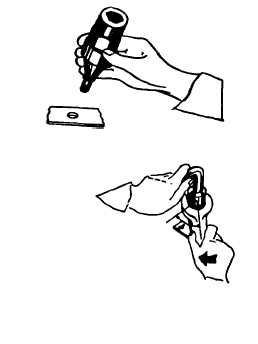
(6) Place hex wrench (supplied
with header) in socket of header jackscrew
and place box-end or adjustable wrench,
Appendix B, Item 11, on hex nut approximately
60° rotation from line of hex wrench.
4-178