TM 10-5411-200-14
T.O. 35E4-177-1
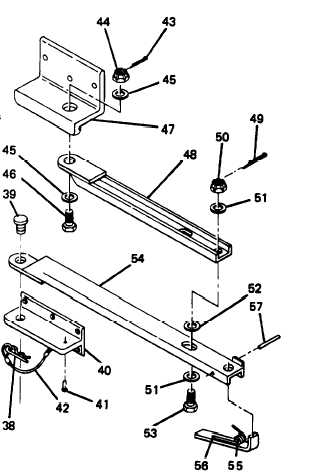
4-17.
(cont)
Door Stop Assembly
12.
Remove hair pin (38), pin (39),
and bracket (40).
13.
Drill out rivet (41) to remove
lanyard (42).
(Refer to paragraph
4-32)
14.
Remove cotter pin (43), nut (44),
washers (45), and bolt (46)
securing bracket (47) to upper
brace (48).
15.
Remove cotter pin (49), nut (50),
washers (51), nylon washer (52),
and bolt (53) securing upper
brace (48) to lower brace (54).
16.
Compress spring (55) with catch
(56) and drive out roll pin (57).
CLEANING, INSPECTION
1.
surfaces.
2.
for
Clean panel and component
Inspect mounting surfaces
corrosion and damage.
3.
R E P A IR
1.
2.
Inspect for and replace if necessary:
a.
Missing or damaged components
b.
Corrosion or paint damage.
Panel skin damage. (Refer to paragraph 4-31 through 4-42)
Corrosion or paint damage.
(Refer to paragraph 4-43)
ASSEMBLY
Door Stop Assembly
1.
Position catch (56) and spring (55) in lower brace (54) and install
roll pin (57).
2.
Install bolt (53), washers (51), nylon washer (52), nut (50), and
cotter pin (49) securing lower brace (54) to upper brace (48).
3.
Install bolt (46), washers (45), nut (44), and cotter pin (43),
securing upper brace (48) to bracket (47).
4-62